How to Check Water Heater Thermostat for Continuity
How Do I Troubleshoot My Electric Water Heater Thermostat?
An electric thermostat will most likely have 2 thermostats, an upper and a lower thermostat. Both thermostats are concealed using a metal cover plate secured to the water heater using one or two screws.
The function of a water heater thermostat is to turn the power to the heating element on and off. It does that relative the water temperature inside the water heater.
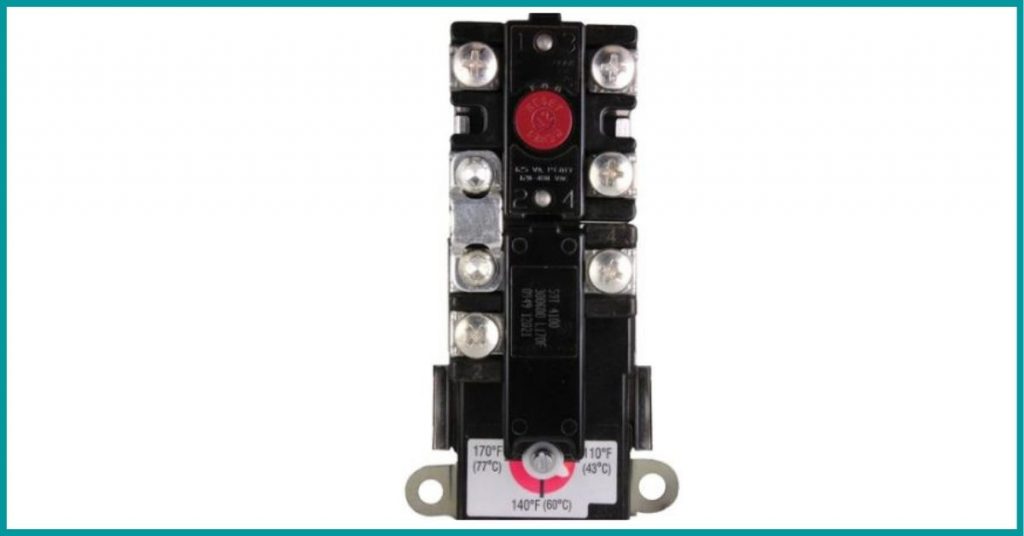
The upper thermostat is usually connected to the water heater reset button. In most water heaters, this is a red button that is also concealed by the cover plate.
A water heater reset button which is also known as an emergency cut off (ECO) switch cuts off power to the water heater (by tripping) in the event of an unsafe condition. This is most likely caused by a bad thermostat, short heating element or loose wiring.
Somethings you may think that the reason you have no hot water is because of a bad thermostat, but the reset button may have tripped, especially if there was a power surge.
If there was a power surge or the thermostat fails to turn off the heating element, the water temperature will increase past the thermostat setting all the way to the reset button rating (1800 F) which will cause it to trip and turn off power to the heating element.
With a tripped reset button, the water in the water heater will no longer be heated and as a result you will have no hot water in the house.
If you have no hot water at all, you most likely have a bad upper thermostat while hot water that runs out fast is a sign of a bad lower thermostat. A water heater reset button that keeps tripping is also another sign of a bad thermostat.
To test a water heater thermostat, start by turning off power at the breaker then remove cover plates and insulation. Use a multimeter to test for continuity between 2 thermostat terminals. A good thermostat should have a reading of 0 ohms.
If the reading is more than zero the thermostat will need to be replaced. While at it, take your time to check if the reset button has tripped, and also test the heating element for continuity as well.
How to Test a Water Heater Thermostat with a Multimeter
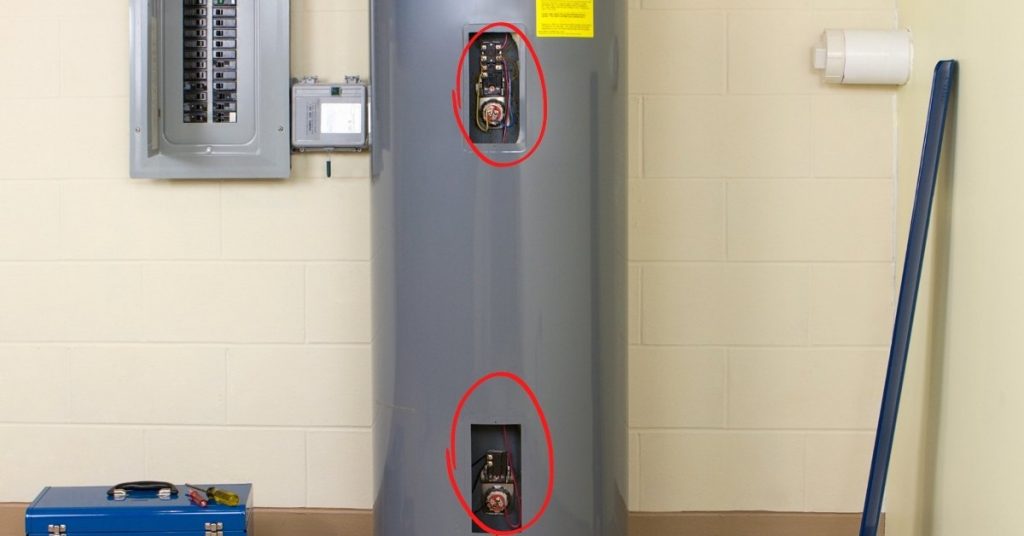
A multimeter is used to test for continuity. Continuity basically tests whether an electrical current is open or closed. With a closed circuit, current can flow through but it cannot flow through an open circuit.
As hard as it may sound, testing a water heater thermostat for continuity is actually pretty easy and fast. You however need to do it safely as I will outline in this post.
To test if your water heater thermostat is bad, follow these steps:
1. Turn off Power to the Water Heater
You cannot test a thermostat with power still flowing through it. There will most likely be 240 volts flowing through the circuit which is enough to electrocute you.
You can turn off power to the water heater at the circuit breaker, unplugging it from the power outlet or both. I suggest that you do it at the breaker.
Your house's electrical panel will most likely be located in the garage, basement or in a storage closet. Look for the breaker labeled "Water Heater" and flip it to the off position.
2. Gain Access to the Thermostat
As I mentioned earlier, your electric water heater will have 2 thermostats. Start with the upper thermostat.
- Look for a cover plate (protruding outwards) secured to the water heater using 1 or 2 screws.
- Use a screwdriver to remove the screws and place them a way where you can't lose them.
- Remove the insulation. You will see a piece of insulation that will be covering the thermostat and element. Remove it as well. You can as well secure the insulation on the water heater using duct tape.
- Most water heaters will have a plastic cover over the thermostat. Pull it out. The cover snaps on the thermostat and heating element.
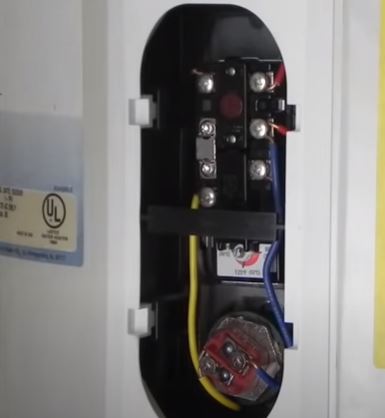
With the cover plate out of the way, you can now see the thermostat, reset button and heating element. The thermostat is the one at the top with a series of screws and wires connected to it.
At the bottom you see will 2 wires connected to 2 screws. That is the heating element threaded on the tank. The reset button will be slightly above the heating element and will most likely be a red button.
You will also see the thermostat temperature adjustment dial (looks like a big plastic screw). This is used to adjust the temperature settings of the thermostat.
3. Inspect the Reset Button
As I had mentioned earlier, the reason you could be having no hot water could be because the reset button has tripped. Although a tripped reset button could be caused by a bad thermostat, it could also be caused by a shorted heating element among other electrical problems like a power surge.
Check to see if the rest button has tripped. A tripped reset button will have popped out all the way.
To reset a tripped reset button, press it inside until you hear it click. If it doesn't click, press and hold it for about 5 seconds.
Just doing that could be the solution to your water heater problem. I will however advice that you continue to test the thermostat and heating element even after resetting the reset button.
4. Test the Thermostat for Continuity
- Before doing anything, start by taking a picture of the thermostat connections with your phone or digital camera. That way you will be in a position to remember which wire was connected where later.
- Loosen the screws just a little and disconnect the wires.
- Using a flathead screwdriver, turn the thermostat temperature adjustment dial to the highest (hottest) setting.
- Prepare your multimeter. If you have an analogue multimeter, move the dial to the lowest ohms of resistance settings. To calibrate it, pinch the 2 probes together and adjust the needle to read zero. ohms.
- With a digital multimeter, move the dial to the least ohms of resistance settings or better still if you have a tone (indicated by a microphone symbol) move the dial there.
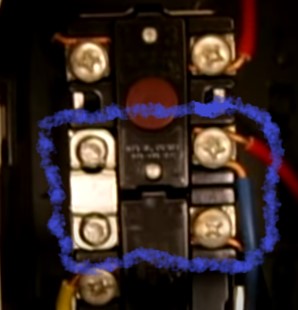
- On the thermostat, you will see 4 sets of screws, 2 on the left and 2 on the right. Place the 2 multimeter probes on the left set of screws, one on top of the other. Check the reading on the multimeter.
- Measure the resistance on the other sets of screws (the ones on the right).
- Use your flathead screwdriver again to move the thermostat temperature dial to the lowest settings.
- Repeat the test above, with the left and right thermostat terminals.
In both of the tests above, your multimeter should read zero ohms. Any other figure apart from that you have a bad thermostat and it will need to be replaced.
- Leave the upper thermostat temperature adjustment dial at the lowest setting and proceed to the test the lower thermostat.
- Remove the lower cover plate, insulation and plastic cover as above and get ready to test it.
Note:As you will find out, the upper thermostat and the lower thermostat are not identical. Bear this in mind if you will be replacing one of the 2 thermostats.
- Adjust your lower thermostat to the lowest temperature setting.
- Measure the resistance (continuity test) across the thermostat terminals. Note down your reading. You will notice that the lower thermostat has only 2 terminals.
Testing the Water Heater Elements
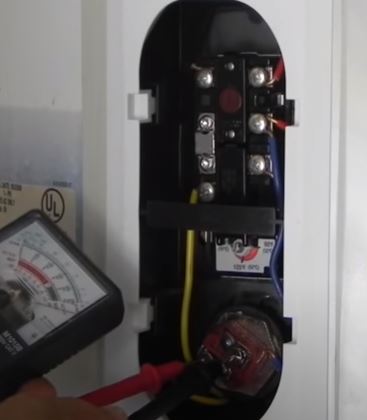
As I said, the problem with your water heater could also be caused a shorted heating element. If the thermostats appear to be ok, I would suggest that you test the heating elements for continuity as well.
Here is how you do it:
- Start with the upper heating element.
- Disconnect the 2 wires on the screws.
- Place the 2 multimeter probes on the screws and check the reading on the multimeter.
- Move to the lower heating element and repeat the same.
A good heating element should have a resistance of between 10 and 16 ohms. If you get a zero reading or one that is too low then the heating element is faulty and will need to be replaced.
How to Replace a Water Heater Thermostat
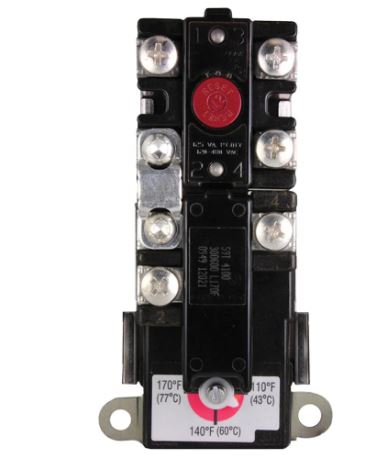
Replacing a thermostat is incredibly easy. The challenge might be in buying the correct one. All thermostats are not universal.
You will first need to determine if you have a single or dual-thermostat heater, and as I have already said, identify if you need to replace the upper or lower one.
I personally like to replace both thermostats at the same time even if only one is faulty. There is high chance of the second one failing after the first one. Replacing both of them will also give you piece of mind for the next few years.
You old thermostat will have the model number on it so you only need to buy the same model, and preferably by the original water heater manufacturer.
Here is how you replace a water heater thermostat:
- Turn off power to the water heater.
- Remove the cover plate, insulation and plastic cover.
- Loosen the screws and disconnect the wires.
- Pull out the thermostat. The thermostat is held in place by a metal bracket at the bottom. Gently pull the bracket outwards and lift off the thermostat.
Note: Be very careful with the bracket. Breaking it will mean that you will need to buy a new water heater.
- Insert the new thermostat where the old one was.
- Carefully connect the wires as they were and tighten the screws
- Put back the plastic cover, insulation and cover plate.
- Turn on power to the water heater.
- Wait for about 20 minutes and check if your water is sufficiently heated.
If the problem was with your heating element, replacing it as well is easy but time consuming. Again I recommend that you replace both the heating elements as well.
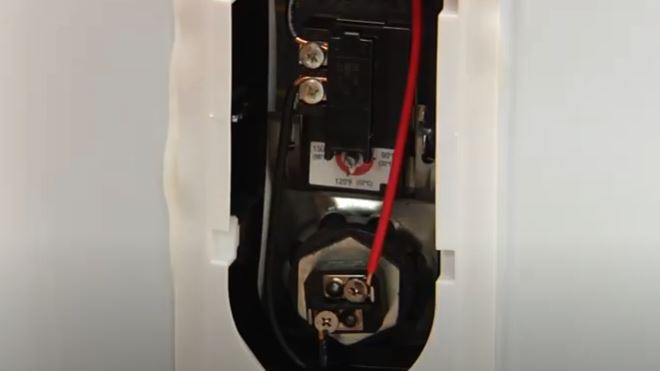
- To replace a water heater element, you will first need to turn off power to it, shut off cold water supply, and drain the tank.
- With the tank fully drained, disconnect the wires connected to the 2 heating element screws.
- Use a 1 ½ inch socket wrench to loosen the heating element and pull it out.
- Replace it with a new one and don't forget the washer.
- Connect the wires backs to the screws and tighten the screws.
- Fill the tank with water. Never turn on the power with an empty tank. You will burn the new elements.
- Once that tank is full make sure there are no leaks around the heating elements.
- Put the cover and insulation back.
- Power the water heater and wait for about 20 minutes for the water to get hot.
And basically that is how to test, troubleshoot and replace a water heater thermostat. I hope you are now sufficiently educated on the same.
Source: https://plumbingsniper.com/how-to-test-a-water-heater-thermostat/
Postar um comentário for "How to Check Water Heater Thermostat for Continuity"